In the world of video editing, transitions play a crucial role in creating a seamless and captivating visual experience. Whether you’re a professional filmmaker or an amateur content creator, having access to powerful editing tools can significantly enhance the quality of your videos. CapCut, a free online video editor, has emerged as a top choice for creators seeking user-friendly functionality and professional-grade features. In this tutorial, we will explore CapCut’s transition capabilities and how to master them to achieve smooth video flow.
Elements of CapCut’s Transitions for Smooth Video Flow

CapCut offers a wide range of transition effects that can elevate your videos from ordinary to extraordinary. Let’s take a look at some of its notable features:
- Seamless Cuts:CapCut allows you to seamlessly cut between different clips, ensuring a smooth transition between scenes. This feature eliminates any jarring or abrupt jumps, creating a more natural and polished video.
- Fade In/Fade Out: With CapCut, you can easily add fade-in and fade-out effects to your clips. This gradual transition from darkness to full visibility or vice versa adds a touch of professionalism to your videos and helps smoothen the overall flow.
- Cross Dissolve: The cross dissolve transition in CapCut blends two clips together by gradually fading out one clip while simultaneously fading in the next. This creates a smooth and visually pleasing transition between scenes, perfect for maintaining a seamless flow.
- Slide and Push Effects:CapCut offers various slide and push transitions that enable you to move smoothly from one clip to another. These effects can slide or push the current clip out of view while bringing in the next one, resulting in a fluid and captivating video flow.
- Split Screen:With CapCut, you can divide your screen into multiple sections and display different clips simultaneously. This split-screen transition adds visual interest and allows for seamless comparisons or storytelling, enhancing the overall flow of your video.
- Speed and Time Effects: CapCut enables you to control the speed and timing of your transitions. You can speed up or slow down the transition between clips, creating a dynamic and engaging video flow that suits your storytelling needs.
- Customization Options:CapCut allows you to customize the duration, timing, and style of transitions. You can adjust the length of each transition, apply easing effects for smoother movements, and personalize the overall look and feel to match your video’s theme.
Step-by-Step Guide to Using CapCut’s Transition Feature
Now that we understand the key features of CapCut’s transitions, let’s dive into a step-by-step guide on how to use them effectively to achieve smooth video flow;
Step 1: Upload and Arrange Video Footage
Launch CapCut on your PC’s browser and upload the desired video clips into CapCut’s timeline. Arrange the clips in the desired order on the timeline to establish the foundation of your video.
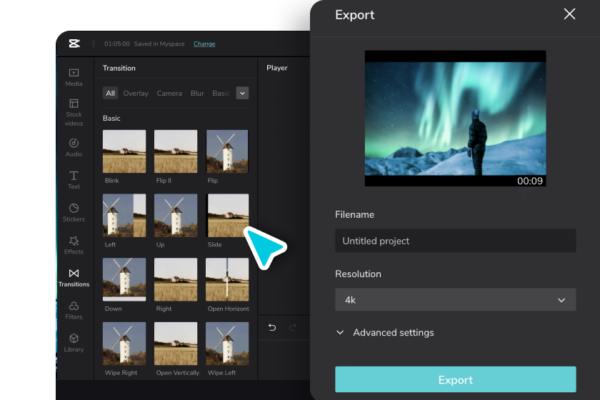
Step 2: Access the Transitions Library
Locate the transitions library within CapCut’s interface. Typically, it can be found by tapping on the transition icon, often represented by two overlapping squares or circles. This will open up a wide array of transition options to choose from.
Step 3: Select and Apply a Transition
Browse through the available transitions and choose the one that best fits the mood and style of your video. Tap on the selected transition to preview it in the video player. Once satisfied, drag and drop the transition between two clips on the timeline to apply it.
Step 4: Adjust Transition Properties
After applying the transition, you can fine-tune its properties to achieve the desired effect. CapCut allows you to adjust the duration, speed, and style of the transition. Experiment with these settings to ensure a seamless and visually pleasing flow between the clips.
Step 5: Layering and Overlapping Transitions
To add an extra layer of creativity and smoothness to your video, consider overlapping multiple transitions. This technique can be particularly effective when transitioning between complex or contrasting scenes. Experiment with different combinations by adding additional transitions to further enhance the flow and impact of your video.
Step 6: Preview and Refine
Periodically preview your video to evaluate the effectiveness of the transitions and overall flow. Make any necessary adjustments by repositioning, resizing, or changing the properties of the transitions. The video background remover will help you fine-tune your video’s background. Continuously refining your work will ensure a polished and engaging final product.
Benefits of Transitions in Videos

The benefits of transitions in a video include the following;
- Enhancing Visual Appeal:Transitions add a professional touch to videos by making them visually captivating. Smooth transitions between scenes create a pleasing aesthetic, ensuring a seamless progression from one shot to another. This polished look not only grabs attention but also gives the impression of a well-crafted and high-quality production.
- Fostering Narrative Continuity: Transitions play a crucial role in maintaining the narrative flow of a video. They bridge the gap between different scenes, helping to connect ideas, events, or locations. By providing a smooth transition, viewers can follow the story effortlessly without feeling disoriented or confused.
- Emphasizing Key Moments:Certain transitions, such as cuts, fades, or zooms, can be used strategically to highlight important moments in a video. For example, a dramatic zoom-in during a climactic scene can intensify the impact, while a subtle fade-out can signal the end of a chapter or mark a transition in time. These visual cues guide the audience’s attention and enhance the emotional impact of the content.
- Improving Pacing and Rhythm:Transitions serve as pacing tools, helping to control the rhythm and tempo of a video. A well-timed transition can create a sense of anticipation or surprise, build tension, or provide a momentary pause for reflection. By effectively managing the pacing, transitions contribute to a dynamic and engaging viewing experience.
- Adding Creativity and Style: Transitions offer an opportunity to infuse creativity and style into a video. Various transition effects, such as wipes, spins, or flips, can be employed to match the tone, theme, or genre of the content. These creative choices add flair and personality, making the video more memorable and distinctive.
Conclusion
CapCut has proven to be an invaluable tool for creators seeking to master transitions and achieve smooth video flow. With its diverse library of transitions, customizable options, and the ability to layer and overlap effects, CapCut empowers users to transform their videos into captivating visual experiences.